Simple Elegant Crepe Recipe – Sweet Savory Delights
Crepe Recipe perfection awaits! There’s something undeniably magical about a beautifully made crepe. Light, delicate, and incredibly versatile, crepes hold a special place in kitchens and hearts worldwide. From elegant brunch spreads to comforting dessert finales, these thin pancakes are a canvas for endless culinary creativity. What truly makes a crepe recipe stand out? It’s the balance – that perfect interplay of a slightly crisp edge giving way to a tender, almost melt-in-your-mouth interior. Whether you dream of classic sweet fillings like Nutella and berries, or savory sensations featuring cheese and beef ham, mastering this fundamental crepe recipe will unlock a universe of delicious possibilities. Get ready to impress yourself and your loved ones with these foolproof crepes!
Crepe Recipe
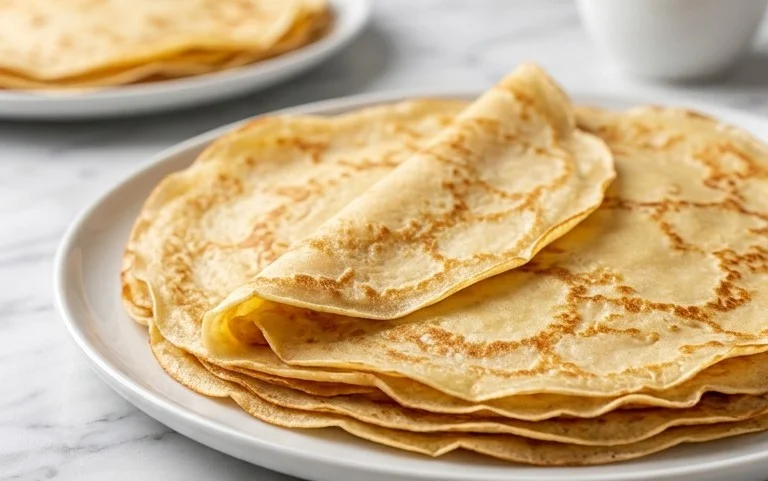
There’s something wonderfully elegant yet surprisingly simple about crepes. These thin, delicate pancakes are incredibly versatile, serving as the perfect canvas for both sweet and savory fillings. From a decadent breakfast treat to a light lunch or even a sophisticated dessert, crepes are always a crowd-pleaser. The beauty of making crepes from scratch lies in their simplicity; the batter comes together in minutes, and once you get the hang of swirling them in the pan, you’ll be churning them out like a pro. This recipe will guide you through creating perfect, light, and delicious crepes every time. So, let’s gather our ingredients and get ready to whip up a batch of these delightful French classics!
Ingredients:
- 2 cups milk (, I use 2%)
- 2 large eggs
- 3 Tablespoons unsalted butter (, melted and slightly cooled)
- 1 Tablespoon granulated sugar
- 1 teaspoon vanilla extract
- 1/2 teaspoon fine sea salt or table salt
- 1 1/2 cups all-purpose flour (, sifted if desired)
The Batter: A Simple Blend
The foundation of any good crepe is a smooth, well-balanced batter. Our ingredient list is straightforward, focusing on quality components that will yield a light and tender result. The milk provides moisture and richness, while the eggs bind everything together and add to the delicate texture. Melted butter contributes to the flavor and helps prevent sticking, adding a subtle richness that elevates the crepe beyond just flour and liquid. A touch of sugar enhances the flavor, especially for sweet applications, and vanilla extract adds a warm, inviting aroma. The salt, while a small amount, is crucial for balancing the sweetness and bringing out the other flavors. Finally, the all-purpose flour is our structure. Sifting it is an optional but recommended step; it aerates the flour, which can contribute to a lighter batter and prevent lumps.
Crafting the Perfect Crepe Batter
Making the crepe batter is a straightforward process that requires just a few simple steps. The key is to achieve a smooth, lump-free consistency that will spread thinly and cook evenly.
1. **Combine Wet Ingredients:** In a medium-sized bowl, whisk together the 2 cups of milk, 2 large eggs, and the melted and slightly cooled 3 tablespoons of unsalted butter. It’s important that the butter isn’t too hot when you add it to the eggs, as it could potentially scramble them. A gentle whisking will ensure everything is well incorporated. Add the 1 tablespoon of granulated sugar, 1 teaspoon of vanilla extract, and 1/2 teaspoon of salt to this wet mixture. Whisk again until everything is thoroughly combined.
2. **Incorporate the Flour:** Gradually add the 1 1/2 cups of all-purpose flour to the wet ingredients. You can do this by sifting it directly over the bowl, or simply by adding it in portions. It’s best to add the flour in stages rather than all at once. This helps prevent the formation of stubborn lumps. As you add the flour, whisk gently but consistently. Continue whisking until just combined and no dry streaks of flour remain. The batter should be smooth and pourable, similar to the consistency of heavy cream. Don’t overmix at this stage, as overworking the gluten in the flour can lead to tough crepes. A few tiny lumps are acceptable and will often disappear during cooking.
3. **Rest the Batter (Optional but Recommended):** For the best texture, I highly recommend letting the crepe batter rest for at least 30 minutes at room temperature, or up to 24 hours in the refrigerator. This resting period allows the flour to fully hydrate, the gluten to relax, and any tiny lumps to dissolve. If you refrigerate the batter, it will thicken considerably. You’ll likely need to whisk in a tablespoon or two of milk before cooking to achieve the right pouring consistency.
Cooking the Crepes: A Delicate Dance
Now comes the fun part – cooking! This is where your beautiful crepe batter transforms into delicate, golden-brown discs. A good non-stick pan is your best friend here.
4. **Heating and Greasing the Pan:** Place a non-stick skillet or a crepe pan over medium heat. It’s crucial to get the pan to the right temperature. If it’s too hot, the crepe will cook too quickly and burn before it can spread evenly. If it’s too cool, the crepe will be gummy and won’t brown properly. You can test the heat by flicking a tiny drop of water onto the surface; it should sizzle and evaporate quickly. Lightly grease the pan with a tiny bit of butter or cooking spray before pouring the first crepe. You might need to re-grease every few crepes depending on your pan.
5. **Pouring and Swirling the Batter:** Once the pan is heated, pour about 1/4 cup of the crepe batter into the center of the hot pan. Immediately pick up the pan and tilt and swirl it in a circular motion. The goal is to quickly spread the batter into a thin, even layer that covers the entire bottom of the pan. Work swiftly; the heat will start to set the batter almost immediately. Continue swirling until you have a thin, even circle of batter. If you have a gap, you can add a tiny bit more batter to fill it. This swirling technique is the hallmark of crepe making and takes a little practice, but you’ll get the hang of it!
6. **Cooking the First Side:** Let the crepe cook undisturbed for about 1 to 2 minutes. You’ll know it’s ready to flip when the edges start to look dry and slightly lifted from the pan, and you see small bubbles forming on the surface. You can gently lift an edge with a spatula to check for a light golden-brown color underneath.
7. **Flipping and Cooking the Second Side:** Carefully slide a thin, flexible spatula under the crepe and confidently flip it over. The second side will cook much faster, usually in about 30 seconds to 1 minute. You’re looking for a similar light golden-brown color on this side. Once cooked, slide the crepe onto a plate.
8. **Continuing the Process:** Repeat steps 4 through 7 with the remaining batter. As you cook the crepes, you can stack them on top of each other on the plate. The residual steam will help keep them soft and pliable. If you’re not serving them immediately, you can cover the stack with plastic wrap to prevent them from drying out.
Now your delicious, homemade crepes are ready to be enjoyed! Whether you fill them with fresh berries and whipped cream, beef ham and cheese, or a simple dusting of powdered sugar, these versatile crepes are sure to impress. Enjoy the process, and savor the delightful results!

Conclusion:
And there you have it! My go-to crepe recipe, a simple yet incredibly versatile foundation for endless culinary creations. What makes this recipe so great is its simplicity and the beautiful, delicate texture it produces. These crepes are light, slightly sweet, and perfect for both breakfast and dessert. I love how quickly they come together, making them an ideal option for a special brunch or a weeknight treat. Don’t be intimidated by the thin batter; with a little practice, you’ll be swirling them out like a pro!
These crepes are fantastic on their own, dusted with a little powdered sugar and a squeeze of lemon. But the real magic happens with your toppings! Try them with fresh berries and whipped cream for a classic dessert, or opt for a savory filling like beef ham and cheese for a delightful lunch. You can also get creative with Nutella, fruit compotes, or even a dollop of Greek yogurt and honey.
Don’t hesitate to experiment with variations! Add a touch of vanilla extract to the batter for extra flavor, or try incorporating a little cocoa powder for chocolate crepes. For those seeking gluten-free options, I’ve found that a good quality gluten-free flour blend works wonderfully, though you might need to adjust the liquid slightly. I truly encourage you to give this crepe recipe a try; you might just find your new favorite go-to!
Frequently Asked Questions:
Why are my crepes tearing when I flip them?
Tearing often happens when the crepe is too thin or the pan isn’t hot enough. Make sure your pan is adequately preheated before adding the batter. Also, don’t overcrowd the pan with batter; a thin, even layer is key. Wait until the edges start to look dry and slightly golden before attempting to flip. A flexible spatula is also your best friend here!
Can I make the crepe batter ahead of time?
Absolutely! The crepe batter actually benefits from resting. I recommend making it at least 30 minutes before you plan to cook, or even the night before. This allows the gluten to relax, resulting in more tender crepes. Just give it a good whisk before cooking, as it may separate slightly.
What kind of pan is best for making crepes?
A non-stick crepe pan is ideal, as it’s designed with low, straight sides for easy flipping and even heat distribution. However, a good quality non-stick skillet will also work perfectly well. The most important factor is ensuring your pan heats evenly and doesn’t have any sticking points.
Classic Crepe Recipe
A simple and versatile crepe recipe perfect for breakfast, brunch, or dessert.
Ingredients
-
2 cups milk
-
4 large eggs
-
3 Tablespoons unsalted butter, melted and slightly cooled
-
1 Tablespoon granulated sugar
-
1 teaspoon vanilla extract
-
1/2 teaspoon fine sea salt
-
1 1/2 cups all-purpose flour
Instructions
-
Step 1
In a large bowl, whisk together the milk, eggs, melted butter, granulated sugar, vanilla extract, and salt. -
Step 2
Gradually add the flour to the wet ingredients, whisking until just combined and smooth. A few small lumps are okay. -
Step 3
Let the batter rest for at least 10 minutes (or up to 30 minutes at room temperature, or longer in the refrigerator). This helps the flour absorb the liquid and results in more tender crepes. -
Step 4
Heat a lightly oiled or buttered non-stick skillet or crepe pan over medium heat. The pan is ready when a drop of water sizzles and evaporates quickly. -
Step 5
Pour about 1/4 cup of batter into the hot pan and swirl immediately to coat the bottom evenly. Cook for 1-2 minutes, until the edges start to lift and the bottom is lightly golden. -
Step 6
Flip the crepe using a spatula and cook for another 30-60 seconds on the other side. -
Step 7
Slide the finished crepe onto a plate. Repeat with the remaining batter, stacking the crepes as you go.
Important Information
Nutrition Facts (Per Serving)
It is important to consider this information as approximate and not to use it as definitive health advice.
Allergy Information
Please check ingredients for potential allergens and consult a health professional if in doubt.